Category Archives: Custom Jobs

Firebrick & Greenstone Pendant

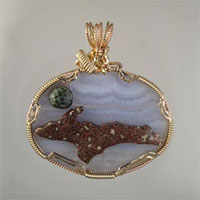
I have a most creative customer (Nelson) who is always thinking outside the box when it comes to jewelry design. His latest concept was a Upper Peninsula representative pendant with an Isle Royale Greenstone placed approximately where Isle Royale is located. Nelson was given the honor of naming this pendant which he called “Yooperland”, so for here on out they will be Yooperland Pendants.

After some thought Nelson decided on a U.P. cut from firebrick. Firebrick has been talked about in my blog before but let’s review: When the copper smelters were build in copper country, they were made of brick. Over the years as copper was smelted, the copper vapors and solids permeated into the brick and replaced everything except the silica materials. After the mines were closed the ovens and stacks were either taken down or fell down. Enterprising individuals then took away some of this heavy material and used it in lapidary projects. Today fire brick is quite scarce, but there are still stashes around. Since firebrick has such a great story of the Copper Country, it makes wonderful conversational jewelry.

This "yooper special" is a wonderful design.

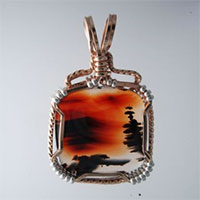
This "Yooperland" is a wonderful design.

I usually coat my firebrick jewelry with a two-part epoxy resin to prevent it from tarnishing. This will keep the “Yooper land” pendant shining with a coppery look.

I used a 30X40mm Blue Lace Agate cabochon as the base for this project. After cutting out the firebrick and prepping it, I polished a wonderful Greenstone. Both of those stones were glued to the Blue lace so it appears as if everything is floating in Lake Superior.

The wire wrapping in gold and silver is quite elegant as befitting Nelson’s Queen. I added additional height to the perimeter to protect the firebrick and the greenstone. I expect Nelson’s wife will have a wonderful birthday gift. She loves U.P. themed jewelry.

I expect to make several more of these before spring. I believe these pendants will be one of our most popular, especially for our U.P. shows.

Nelson wrote me after giving his wife her Yooperland: The YOOPER LAND pendant is OUTSTANDING! I gave it to my wife for her birthday and she loves it. However there is a small issue that I must deal with when we go out in public. Nearly everyone comments on her necklace- BUT the rest of the people just stare. Sometimes I get a little jealous . MAYBE the solution would be a turtle neck shirt!

By the way my wife says “THANKS”

Victoria Stone Pendant-Ugly to Beautiful

I met a lovely woman at our last show named Sue. She was wearing a beautiful dark blue Victoria Stone BUT this stone was wire wrapped (I just do not want to say ugly); OK, it was a really ugly, tarnished, wire wrapped job. The primitive prong setting covered much of the pattern of this stone. I never cover a gorgeous stone with wire. I seldom say anything bad about a piece of someones’ jewelry, but in this case I had to speak up and be honest.

The ugly pendant.

The ugly pendant.

No longer ugly-notice the back side is now out.

No longer ugly-notice the back side is now out.

Sue’s husband had purchased the pendant at a garage sale and obviously got a good deal by his reaction when I told them what the stone was and what it was worth. I suggested that they allow me to re-wrap the stone, so that this Victoria Stone could be presented in a manner befitting it. I talked to them about Victoria Stone and its’ rarity.

They came back later and agreed that I should re-wrap this lovely stone. I agreed to do this overnight and you can see the results. I re-wrapped using .930 Argentium and 14/20 rolled gold. I noticed that the poor side of the stone was selected to be the front by the original wire wrapper hiding the side with the most chatoyancy, so I turned the stone over so the back side was now the front side in my finished pendant. I made the pendant so that if it does flip over as it is worn, it still looks good. I and Sue were delighted with the results. If you have an “ugly” wire wrapped pendant, and want results similar to Sue’s, get ahold of me.

This is the rear now.  Noticed it was the front on the ugly pendant.

This is the rear now with little chatoyancy. Notice it was the front on the original pendant.

Opal Fish Jewelry

One of my favorite unusual things I enjoy wire wrapping are really fantastic fish carved from seam opal. The opal seam is very thin and would be a real challenge to make a cabochon from. These fish are carved overseas and it is one of the few stones I purchase. As most of you know I generally cut my own cabs, but these fish are a whole different thing. They are one of those things I can’t help but buy.

A fine opal fish

A fine opal fish

Rear of fish

Rear of fish

Originally I bought fish with no idea how I was going to wrap them, but after thinking about these for several months I had a dream of how to wrap them using a prong set method. By using prongs, the wrap does not distract from the stone. I find by hiding the bail behind the fish they appear to be hanging from a chain, but all that is seen from the front is the fish. Prong-setting is an advanced wire-wrapping technique, which I developed with some special proprietary methods for this “fishy” jewelry.

These fish are carefully carved on the rear, just as they are in the front, but there usually is no opal on the reverse. Some of these fish have their own personality. The carving is different and the rock appearance is different, giving each one a distinctive look. Different body and tail positions on the carvings convey different attitudes. Some people even name their fish!

The fish come in several sizes and it takes a bit of “fiddling” to set the prongs correctly. Hey if it were easy everyone would do it! Everyone that has acquired a fish raves about all the nice comments they receive. You cannot wear one and expect people not to see it.

I have several fish I purchased in Tucson this year, so expect to see a few on this site after the summer shows. If you need one before then, let me know and I will photograph what I have available.

This one was a special request to add a lure.

This one was a special request to add a lure.

Another fish-front side

Another fish-front side

fishfrt2

Jeane’s Dragonfly

As a fun project I made a dragonfly pendant bead-dragonfly-11based on a design I found in one of Jessie Donnan‘s advanced wirewrapping books. The first dragonfly features glass beads for the body. I had the glass dragonfly out at a show in Michigan’s Upper Peninsula and one of our customers, Jeane, liked it. She had the creative idea that I should make another copy using Michigan’s distinctive state gemstone, the Isle Royale Greenstone. Jeane is an avid lover of Upper Peninsula rocks and minerals as I am.

I am always up to a challenge, and I immediately thought that this was a wonderful idea. I used silver beads for the eyes of the dragonfly, but made it from 14/20 gold filled wire. The trick was in finding enough greenstones in the right size and having them drilled. dragonfly I may someday make another dragonfly similar to Jeane’s, but for now she has the only one. Thanks for the great idea Jeane!

My Short Sword

The idea for a sword began when I made jewelry for the wedding of some of our friends, Chuck and Debbie (not the same Debbie whose jewelry I have been recently blogging about).

Chuck is one of the handiest guys I know, and one of his many skills is Blacksmithing. Debbie and Chuck are involved in Medieval Festivals in a couple ways. Chuck makes chain mail, knives, and swords as close to those from those olden days as you can find. They also have a family musical group called Evergreen that often plays at these festivals on period instruments.

wedding1

The wedding was a costumed Medieval wedding for their son and his new bride. I made custom pendants of beautiful blue Pietersite for them. I also made a sheriff’s star for another son. The idea of trying a sword came about as a barter between Chuck and I.

Chuck tells:

Originally, the blade was to be a standard 30 to 33 inch sword. The steel was part of a leaf spring from a late 70’s to early 80’s vehicle, usually good steel for this sort of thing. The tang was drawn in the forge, then the blade was drawn with hammer and heat. I was using a charcoal forge instead of coal or gas. I’ve been using charcoal for a more authentic effect at Renaissance and SCA events. The blade was 80 percent complete when I noticed a small flaw in the steel at almost exactly the middle of the blade down its length. I tried everything I could to eradicate the blemish. I surmised that being from that period of time when recycled steel and much of it coming from inferior sources was the cause. It was very disappointing as I already had much work into this blade. I decided to cut the blade short and to finish the project as a short sword. These were also typical weapons throughout the Middle Ages, made for close-quarter and two-handed fighting. I was able to get rid of the blemish and the sword turned out to be quite well balanced and looks great. The cross guard and pomel are of mild steel. After talking with Don, the swords future owner, on the design and layout of the fittings I went back to work on the shaping and finishing of the fittings.

As Chuck was smithing the blade and butt of the sword, I was thinking about what jewels might have been in a sword of that time. A little library research delivered limited results. Certainly carnelian agate may have been used as well as other agates and maybe some rubies, sapphires, and garnets. I decided that I should add some chrysoprase. Although it was certainly not used in these swords, as the best material comes from Australia, I liked the color. It resembles aventurine which may have been used in Medieval times.

Now I had a new problem. I had decided on square cut inlays. How do you cut out square holes in steel? Certainly not with my rock-polishing equipment. I asked my neighbor Mike if he could make square holes in the sword butt so I could insert gems. I think Mike was getting used to all my wild ideas by then and he suggested the answer was a carbon burn out technique.

p3140008

I got the sword back from Mike, cut the stones to precisely fit, yet I was not happy with the carnelian agate stones in their cut out holes. Because they were transparent, the dark depth of the metal background in the holes came through the gems and you could not even tell they were golden in color. They just did not shine. I tried a couple things to brighten the stones including painting gold fingernail polish in the holes. This did not work because the paint was too thick. I had a couple other lame ideas, but I finally thought that gold leaf might work if I could find someone who did that! I stripped the fingernail polish out of the holes and took the sword to a local sign shop that does gold leaf. I think the owner had fun with this project. He told me his employees seemed to work better when he had the sword in his hand! The gold leaf worked like a charm and created a glow that comes through the stones and makes them look noble and amazing.

I returned the sword to Chuck for final polishing and a placement of a bone handle on the unit.

Chuck again:

The two bone slabs were fitted over the full tang and “let in” to the crossguard to insure stability. The slabs are epoxied with a little bone dust for color matching mixed in. The steel parts were blued after all fitting was complete. The end of the tang is threaded and the pommel is tapped so that the parts may be removed if necessary. p3140009It took almost two years to complete this project as the different phases of construction were accomplished by different individuals. All in all, I am very pleased with how it all turned out.

Chuck Sieting

OK, it took Chuck over a year, and it was most fun jabbing him about finishing the sword whenever I saw him around!

I received the beautifully polished sword back eventually and I am pleased to own it, as it is a real show piece.

I added up how much this piece of art might cost with everyone involved and came to a $650 price. So if you want something like this, we can do it, but it won’t be cheap. And you know that though it might be a short sword, but it had a long construction!

Ghostbusters

“Ghostbusters” is another pendant of the “Debbie Collection”, one of her earlier purchases. When Halloween time comes around, you often see her showing off how her ghost seems to fly through the air!

My inspiration on this one came as I was cutting slabs from a very unusual Lake Superior Agate. The agate had distinctive eyes as well as some fortification structure with unusual coloration, mostly white but including some yellow, which is quite rare in Lakers. I immediately saw a face on the second slab, and the pattern continued through the next three slices.

I cut a calibrated oval 30X40 mm cab with the eyes in a position showing the face of the ghost. The position of the eyes toward the side of the cab made me think of a flying ghost.

I took this cab to William Holland School of Lapidary Arts in Young Harris, Georgia for an advanced wire wrapping class I was taking. The first incarnation of the ghost came into being at that time. I thought the piece was quite whimsical and artsy. I kept that piece of jewelry around for a couple of years and my wife wore it at Halloween time each year. Debbie was looking through my pendants one day and fell in love with the ghost. By the time she looked at the original piece I had made a second, less extravagant ghost pendant, but Debbie wanted the wild unit I had created at lapidary school. p12600032 I re-wrapped the original ghost simply because my skill level had progressed substantially and I could see some flashier things to do! This is the pendant that Debbie loves.

The ghost appears to be flying rapidly through the air throwing up a trail of smoke. I really enjoyed creating this extra-ordinary apparition.

Muonionalusta Meteorite

Two children were kicking rocks around one day in 1906, when suddenly one kicked out a very rusty, heavy rock, which seemed so strange and out of place that they took it home. The Muonionalusta area is in northern Sweden north of the Arctic Circle. Scientists did not study this rock until 1948 when it was discovered to be a piece of an iron meteorite. Since then, numerous pieces of the now famous Muonionalusta Meteorite have been found. These meteorites are famous for their fantastic etched patterns (Widmanstatten figures). These patterns are not visible until the meteorites are acid etched.

I first discovered slabs of these meteorites at the Tucson Gem & Mineral Shows in 2008. I had an inspiration that I could make jewelry out of these slabs. I showed Debbie this material and being the adventurous type, she wanted a pendant and ear rings from this material.

It actually took me a few months to think about how I could work with this material. Fortunately my neighbor, Mike, is a tool and die maker, and has a fantastic machine shop. I had Mike cut two rectangular cabs as well as four smaller rectangular cabs for earrings. For the earrings I had him halve the almost quarter inch slab in order to lighten these small cabs so they were suitable (light enough) for earrings. Muonionalusta’s often have small stone inclusions, and metal saws do not like rocks! I watched Mike’s expensive wire-feed saw spark its way through the meteorite, but every time it hit an inclusion it would stop and shut itself down. Then the saw would have to be backed out and start all over down the same cut line. Usually the second cut would make it through the inclusion and continue until the cut was done or it hit another inclusion and shut itself down again, in which case the cut would have to be restarted. This was a very expensive computer-controlled machine, so I owed Mike Christmas jewelry for his two daughters and his wife. Nice that he is a good neighbor and likes to barter.

I rounded the corners of these rectangles on my Genie, then coated the iron pb1003001with epoxy to make them shiny and seal them against rust. I drilled a small hole in the corner of each earring cab.

I wrapped the pendant cab with Argentium and added two violet CZ’s and a Mystic Topaz to one side. I thought they reminded me of stars and they definitely gave the pendant sparkle. I hung the unit at an angle to simulate the meteor tumbling into the atmosphere. The silver wire was the obvious choice, matching the silvery patina of the meteorite.

This jewelry set is one of my favorites and I’ve never seen anything like this before.

Believe me, Debbie loves this set and I see her wearing it often. It is one of the newer additions to the “Debbie Collection”. I’m going to make at least one more similar set in the near future and post it up on this website.

Debbie’s Bluegill Pendant

While cutting an interesting Lake Superior eye agate one afternoon, I saw a fish eye develop. I had an inspiration that if I cut an oval cabochon, then backed that agate with a thin sheet of Jade, I could somehow make a fish come to life. The dilemma then became how to do it.

I first cut a thin slice of mottled green Jade from a rock I found in my collection, then cut it out in a fish shape using my Taurus Ring Saw. A Taurus saw has a continuous circular, diamond coated wire that allows cutting in any direction. It’s a machine that I use occasionally, but on those jobs nothing else works as well. One of the uses for the Taurus is cutting Christmas tree ornaments. Another use is cutting the State of Michigan shape out of Petoskey Stone.

I used two-part Epoxy to bond the fish-eyed cab to the Jade. I then continuously wrapped a frame from Sterling silver, finishing the wrap at the bottom of the fish.

I left extra wire at the bottom and ran that extra wire up the rear of the fish to lock the wire to the fish frame.

Debbie always likes matching earrings for her pendants. In this case I used the same piece of Jade as I used for the backer, and using the Taurus Saw again, I cut the blue gills. With a Foredom and diamond bit I drilled tiny eye holes in the earring fish as well as hole to hang the drops.p12600021

Debbie is an enthusiastic rock hound, has eclectic tastes, and claims many of my unusual pendants. This was one of the early pieces in a growing collection, I refer to as the “Debbie Collection”. I have a lot of fun designing pieces with her, and she graciously has agreed to have her jewelry in the next few blogs. I expect when I become “Rich and Famous” (right!) Debbie should be able to open up a museum of my strange, unusual, and weird stuff.

You can see some of our available agate pendants on several pages: Various, Crazy Lace Agates, Lake Superior Agates, Petrified Wood, and Queensland Agates.

Fabulous Greenstone Pendant

For my first blog about past projects, I have to feature Beth’s Isle Royale Greenstone.

Beth’s husband John is a good buddy of mine and I have been mentoring him for a few years in wire artistry.John is now a superb wire-wrapper in his own right and could have easily wrapped this Greenstone if he had chosen to do so.

John had a HUGE Greenstone that he had found on Isle Royale in the early 1960’s. (Chlorastrolite or Greenstone did not become the Michigan state gem until March 30, 1973. Today collecting Greenstone on Isle Royale National Park is strictly prohibited.) The original Greenstone was approximately 3 ? inches by 2 inches. Considering the average Greenstone is half the size of a pea, this specimen was amazing. beth_greenstone_2 This Greenstone was larger than any I have seen anywhere, even at the Seaman Mineral Museum, which is considered to have the best collection of Michigan rocks and minerals in the world.

The rock was face polished in Houghton years ago, but by using Foredom and rushing the job the lapidarist ended up with divots in the stone and a poor polish.

John asked me to make a pendant for his wife, and my first response was, “Are you sure?” This, after all, was a great specimen. John had thought about it and was certain this was what he wanted to do. John did not have the lapidary equipment to cut and polish the stone properly, so that job was also mine.

I was concerned about cutting this stone, not unlike striking a diamond to split it. There is always a chance of ruination. Greenstones, especially large ones are not solid through and through. The Chlorastrolite often forms in a very thin layer and normally not in a clean pattern. Not many lapidarists can cut greenstone properly. There is a fine line between getting out the bad spots and going completely through the sometimes micro-thin pattern layer. I have cut several thousand greenstones myself, ruining a lot of them in the learning process, so I am well aware of the potential pitfalls. Cutting this beauty was a daunting and exciting task.

The process was pretty much routine until the final cutting and polishing, at which time the best prospect area was marked out for a pendant, and two other areas were marked for potential earrings.John had already suggested an area for the pendant that I agreed was correctly chosen.I roughed out the shape and started cutting on the Genie.I was amazed and pleased that the stone was so solid, having experienced soft Greenstones on numerous occasions.

Greenstones have to be worked on worn wheels to get the best results, so it takes a long time to work one up. This stone had the afore-mentioned divots that had to be meticulously worked out on the 600-grinding wheel with hopes that the Chlorastrolite layer would not be penetrated. Luck was again on my side as a small, classic, Greenstone pattern gradually presented itself. The finished stone turned out to be approximately 1? inches high and 1 inch wide.

John asked me to wrap this stone for Beth, and it was my honor to do so. I used 22Ga 14/20 GF. It is always my policy that the stone is the star in any wire wrap. I only wire to enhance the gem and not to do anything that distracts from the star. I think there are too many wire artists that get carried away in their own artistic abilities and over-wrap their gems. Why distract from a perfectly good gemstone? OK, I’ll get off my bandwagon for now, and get back to the story. I topped off the pendant by wiring Beth’s name on the reverse.

p7290238p7290239

I thank John and Beth for allowing me the honor of making this glorious piece of jewelry.

Oh, by the way, I finished this whole project in one day. Sometimes I just can’t help myself!

Greenstones for your projects and wire-wrapped Greenstone pendants are available for your purchase.

Customer Review:

I thank you for an exceptional pendant. Don took a dark, unassuming specimen greenstone and turned it into a beautiful work of art. The stone has been sitting on a shelf for 40 or so years and now is a bright and beautiful necklace that I will enjoy wearing–I love it! With many thanks, Beth